반응형
간단하게 위젯 배치로 로그인 화면에 대한 구성을 개발 해보자
간단하게 보면 아래와 같은 구조로 시작해야한다.
Stateful 이던 state이던 필수로 구현해야하는 메소드가 있기 때문이다.
import 'package:flutter/cupertino.dart';

class LoginPage extends StatefulWidget {
  LoginPage({Key? key}) : super(key: key);

  @override
  State<StatefulWidget> createState() => _LoginPageState();
}

class _LoginPageState extends State<LoginPage>{
  @override
  Widget build(BuildContext context) {
    // TODO: implement build
    throw UnimplementedError();
  }

}
import 'package:flutter/cupertino.dart';
import 'package:flutter/material.dart';

void main() => runApp(LoginApp());

class LoginApp extends StatelessWidget{
  @override
  Widget build(BuildContext context) {
    return MaterialApp(
      debugShowCheckedModeBanner: false,
      title: 'Login',
      home: Login(),
    );
  }
}
class Login extends StatefulWidget{
  @override
  State<Login> createState() => LoginState();
}

class LoginState extends State<Login>{
  @override
  Widget build(BuildContext context) {
    return Scaffold(
      appBar: AppBar(
        title: Text('Log in'),
        elevation: 0.0,
        backgroundColor: Colors.red,
        centerTitle: true,
        leading: IconButton(icon: Icon(Icons.menu),onPressed: (){}),
        actions: <Widget>[
          IconButton(onPressed: (){}, icon: Icon(Icons.search))
        ],
      ),
      body: Column(
        children: [
          Padding(padding: EdgeInsets.only(top: 50)),
          Center(
            child: Text(
              textAlign: TextAlign.center,
              'logo text'
            ),
          ),
          Form(child: Theme(
            data: ThemeData(
              primaryColor: Colors.grey,
              inputDecorationTheme: InputDecorationTheme(
                labelStyle: TextStyle(color: Colors.teal,fontSize: 15.0)
              )
            ),
            child: Container(
              padding: EdgeInsets.all(40.0),
              child: SingleChildScrollView(
                child: Column(
                  children: [
                    TextField(
                      decoration: InputDecoration(labelText: 'Enter email'),
                      keyboardType: TextInputType.emailAddress,
                    ),
                    TextField(
                      decoration: InputDecoration(labelText: 'Enter password'),
                      keyboardType: TextInputType.text,
                      obscureText: true,
                    ),
                    SizedBox(height: 40.0,),
                    ButtonTheme(
                      minWidth: 100.0,
                      height: 50.0,
                      child: ElevatedButton(
                        onPressed: (){},
                        child: Icon(
                          Icons.arrow_forward,
                          color: Colors.white,
                          size: 35.0,
                        ),
                        style: ElevatedButton.styleFrom(
                          backgroundColor: Colors.orangeAccent
                        ),
                      ),
                    )
                  ],
                ),
              ),
            ),
          ))
        ],
      )
    );
  }

}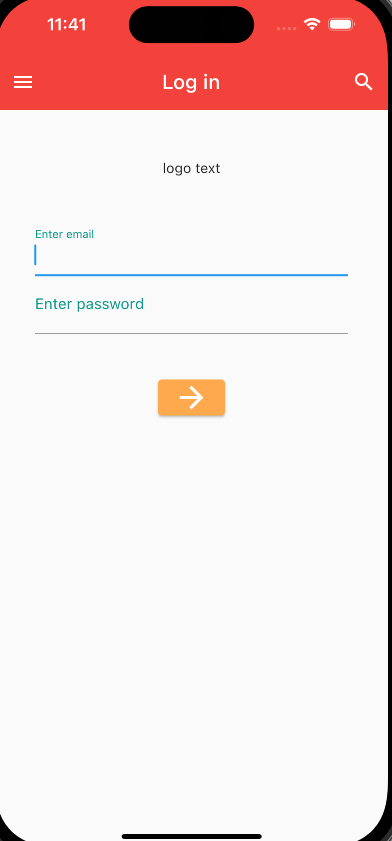
해당과 같은 화면으로 개발이 된다.
구조에 대해서 간략하게 설명을 하면 이렇다.
class LoginState extends State<Login>{해당 부분은 appBar,Body로 이루어져 있다.
해당 Body에서는 계층형으로 구성이 되어있는데
크게 컬럼이 하나있고 그 자식들은 TEXT,FORM 영역으로 나눠져있다.
그리고 form에는 2개의 텍스트 필드와 버튼으로 구현되어있다.
다음에는 버튼 이벤트 발생 및 로컬 캐쉬, 외부 연동 및 가독성 향상을 위한 코드를 추가로 해야겠다는 생각이 든다 (지금 너무 보기 힘들다)
반응형
'[Mobile] > [Flutter]' 카테고리의 다른 글
| [Flutter] 피그마로 레이아웃 잡고 소스뽑기 (0) | 2023.07.15 |
|---|---|
| [Flutter] Widget 별 가독성 향상 (0) | 2023.07.11 |
| [Flutter] 화면 구성 위젯 이해하기 (0) | 2023.07.11 |
| [Flutter] 샘플 프로젝트 분석 (0) | 2023.07.11 |
| [Flutter] 계층 구조 이해하기 (0) | 2023.07.11 |


